Welcome! Please use the navigational links to explore our website.
PartsASAP LogoCompany Logo Auction Link (800) 853-2651

Shop Now

   Allis Chalmers Case Farmall IH Ford 8N,9N,2N Ford
   Ferguson John Deere Massey Ferguson Minn. Moline Oliver

Ford 9N, 2N & 8N Discussion Forum
:

Finished toolbox restoration, here are pics

Welcome Guest, Log in or Register
Author 
James41-9n

03-13-2005 09:03:42


Report to Moderator

third party image

This was the toolbox as I received it. I sat in on the tractor to take the picture


[Log in to Reply]   [No Email]
Tim PloughNman Daley

03-13-2005 13:36:20


Report to Moderator
 Re: Finished toolbox restoration, here are pics in reply to James41-9n, 03-13-2005 09:03:42  
Hey James-
Here's a safer method using plain household white vinegar. Using an old plastic dish pan like yours, put your rusty part in and cover completely with white vinegar. Let stand for several days and watch the rust, dirt, and paint come off like butter. Its better on the natural finish of the metal (patina) than sandblasting. I then use the wife's toothbrush or a fine brass wire brush to scrub the tough areas and then it gets a mineral spirit bath to clean opff the residue. Then I use denatured alcohol to remove the mineral spirit oily residue and its ready to prime and paint after drying. I use this method for all old tools and tractor parts I want to preserve for another 60 years. Be sure to wear rubber gloves as the vinegar will stain your hands a rusty red and smell bad. It may be a slow method but it is a proven method. HTH

Tim Daley

[Log in to Reply]  [No Email]
James41-9n

03-13-2005 09:04:31


Report to Moderator
 Re: Finished toolbox restoration, here are pics in reply to James41-9n, 03-13-2005 09:03:42  
third party image

here is the water bath that cleaned it all up.


[Log in to Reply]  [No Email]
VTXscooter

03-13-2005 11:11:54


Report to Moderator
 Re: Finished toolbox restoration, here are pics in reply to James41-9n, 03-13-2005 09:04:31  
How do you do the bath thing? Do you have instructions or a link?
Thanks, Joe


[Log in to Reply]  [No Email]
Lugnut

03-13-2005 12:02:23


Report to Moderator
 Re: Finished toolbox restoration, here are pics in reply to VTXscooter, 03-13-2005 11:11:54  
Joe, Email me and I'll forward the "bath thing" page to you. Lugnut


[Log in to Reply]  [No Email]
James41-9n

03-13-2005 11:53:01


Report to Moderator
 Re: Finished toolbox restoration, here are pics in reply to VTXscooter, 03-13-2005 11:11:54  
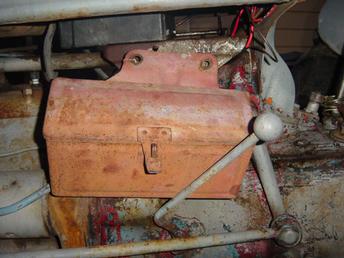
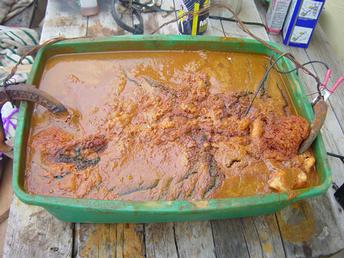
Joe,

easy to do and easy to find on the internet under electrolysis, but here is all you need to do...

1 find a plastic (not metal) tub that will hold your part you want to de-rust and de-paint.

2 get two pieces of metal and wire them together so they are on opposite sides of the tub and wire them to the opposite sides of the tub. I used two old horseshoes and just put them on opposite sides of the tub.

3 get you a 12 volt battery charger but dont plug it in yet, hook the + side of the charger to the metal on the two sides, (my horseshoes).

4 hook the - side to the part you want to clean.

5 fill the tub with water to cover the part you want to clean, and add about 1/4 cup of plain salt to the water.

6 put the part in the water so it is not touching the horseshoe metal things on the sides of your tub.

7 plug in the battery charger and watch it for a couple of minutes. you should see little bubbles coming off the battery charger clamp, if not add another 1/8th cup of salt

8 let it sit for about 12-48 hours and you will have soup like I had.

9 Dont touch the metal or water unless you
un-plug it first, keep the whole thing outside in lots of air as it is giving off Hydrogen (remember the Hindenburg) very flamable

10 I usually pull it out and give it a little help with a hand wire brush as all the loose stuff comes right off and I want it to work on the harder stuff.

11 wash all the salt water off very well before painting it. The soup bath just gets dumped on the ground as it is salt, water, rust (metal) and dirt and some old paint...

This saves a lot of grinding time if you can get a bath big enough. There is a lot of info on the internet.

Let me know how it works for you as it works great for me.

[Log in to Reply]  [No Email]
TIMW(PA)

03-13-2005 14:22:11


Report to Moderator
 Re: Finished toolbox restoration, here are pics in reply to James41-9n, 03-13-2005 11:53:01  
Here is a page on electrolysis. It is where i first learned to do it. Only difference in yours was that he suggwsts using lye, since it will eat the paint off better (also eats your skin too be careful!). Looks good...Tim


[Log in to Reply]  [No Email]
TIMW(PA)

03-13-2005 14:23:41


Report to Moderator
 Re: Finished toolbox restoration, here are pics in reply to TIMW(PA), 03-13-2005 14:22:11  
Dog-gonnit!!! forgot the link...Here goes


[Log in to Reply]  [No Email]
VTXscooter

03-13-2005 12:13:47


Report to Moderator
 Re: Finished toolbox restoration, here are pics in reply to James41-9n, 03-13-2005 11:53:01  
Thanks for the info, I am going to try it on my air cleaner assy first since I have it off.

Joe


[Log in to Reply]  [No Email]
James41-9n

03-13-2005 12:28:39


Report to Moderator
 the top part after, the bottom part is next in reply to VTXscooter, 03-13-2005 12:13:47  
third party image

the top part after, the bottom part is next


[Log in to Reply]  [No Email]
James41-9n

03-13-2005 12:24:09


Report to Moderator
 my air cleaner before in reply to VTXscooter, 03-13-2005 12:13:47  
third party image

here is mine before


[Log in to Reply]  [No Email]
James41-9n

03-13-2005 09:05:20


Report to Moderator
 Re: Finished toolbox restoration, here are pics in reply to James41-9n, 03-13-2005 09:04:31  
third party image

here is the after clean up picture


[Log in to Reply]  [No Email]
James41-9n

03-13-2005 09:06:54


Report to Moderator
 Re: Finished toolbox restoration, here are pics in reply to James41-9n, 03-13-2005 09:05:20  
third party image

and the final picture, all cleaned and painted.

Have a nice day, and thanks to all of you that help on this board. Greenhorns like me could never do this without your help.

James


[Log in to Reply]  [No Email]
[Options]  [Printer Friendly]  [Posting Help]  [Return to Forum]   [Log in to Reply]

Hop to:


TRACTOR PARTS TRACTOR MANUALS
We sell tractor parts!  We have the parts you need to repair your tractor - the right parts. Our low prices and years of research make us your best choice when you need parts. Shop Online Today. [ About Us ]

Home  |  Forums


Copyright © 1997-2023 Yesterday's Tractor Co.

All Rights Reserved. Reproduction of any part of this website, including design and content, without written permission is strictly prohibited. Trade Marks and Trade Names contained and used in this Website are those of others, and are used in this Website in a descriptive sense to refer to the products of others. Use of this Web site constitutes acceptance of our User Agreement and Privacy Policy

TRADEMARK DISCLAIMER: Tradenames and Trademarks referred to within Yesterday's Tractor Co. products and within the Yesterday's Tractor Co. websites are the property of their respective trademark holders. None of these trademark holders are affiliated with Yesterday's Tractor Co., our products, or our website nor are we sponsored by them. John Deere and its logos are the registered trademarks of the John Deere Corporation. Agco, Agco Allis, White, Massey Ferguson and their logos are the registered trademarks of AGCO Corporation. Case, Case-IH, Farmall, International Harvester, New Holland and their logos are registered trademarks of CNH Global N.V.

Yesterday's Tractors - Antique Tractor Headquarters

Website Accessibility Policy