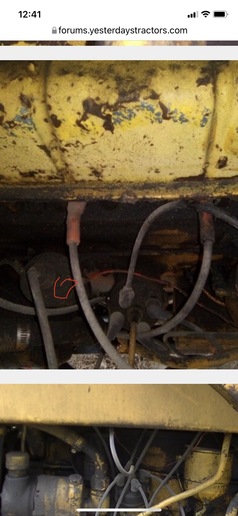
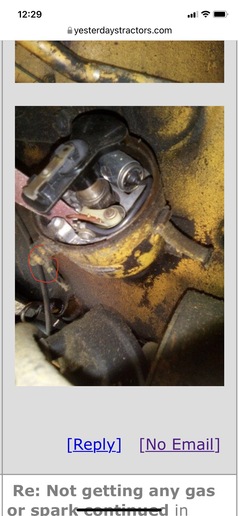
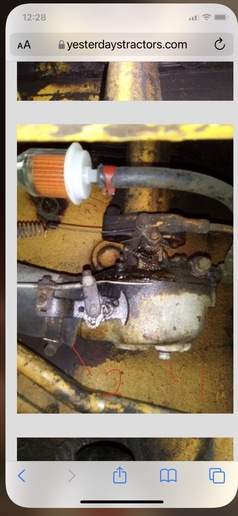
Sorry this is long but I am trying to add enough detail for someone who had to ask what the points are and where are they, for others see previous post. Also trying to explain the test so they can be done by yourself. In your previous post you said you were going to pickup a test light. First a little test light use 101. The test light will have a pointed probe end and a wire lead with a clip on the end. To check test light function put the lead clip will be on a good ground. Maybe a sanded off spot on the tube coming off the oil filter is good. Once you get it clipped on touch the probe to the positive battery cable terminal, if it lights this verifies the ground clip is making a good contact so tests made with the light are valid. With the key on you need to see if the test light shows voltage at the positive terminal of the coil, circled in 1st photo. Now I cannot tell exactly where the wire is coming from on that terminal of the coil but the terminal you want to check is NOT the one that goes to the distributor. If that is good move to the next test which is testing to see if the points are working correctly. You can use the test light in reverse for this test. Take the test light probe and place it into the gap between the negative ..has minus sign.. battery terminal bolt and the battery post. If it will not fit tight wedge a screwdriver blade or something else next to it to hold it tight. Now take the lead clip and touch it to the positive terminal again verifying connection. Then hook the lead clip to the terminal coming out of the side of the distributor. That should be shined up a little with your sand paper, picture 2 shows that. Now crank the motor with the starter the test light should flash on and off as the points open and close. Now the reason people are saying your points are bad may just be due to the picture not being clear. In the 2nd link there is an example set of points on the arm that moves against the spring you see a very defined circular contact point that matches the round stationary contact opposite of it. The photo in your post does not show that round contact point is there very clearly. If that is burned away to the thickness of less than say the thickness of 2 business cards the points probably need replaced. However, if the test light flashes they are still good enough to start the tractor. Next pull out one spark plug run your sand paper through the gap. Now put the spark plug wire back on it. Lay, tape or bungee it to some metal part so the gap can be seen from the seat. Assemble the cap on the distributor and check if you can see a spark every two revolutions of the engine while cranking with the starter. If so you have established you have spark. The last picture shows the carb, the plug marked one is where you will check the gas flow as has been described by others. If that is good loosen the clamp on the intake hose number 2. Remove that hose. This will be a 2 person check unless you can reach the starter button and hold your hand over the inlet on the carb, BE CAREFUL IF YOU DO THIS ALONE MAKE SURE IT IS NOT IN GEAR. Cover that and crank the engine with the starter about 3 seconds. You should feel a strong suction and when you pull you hand away there should be gas dripping out. This will verify that gas is available for combustion in the intake air stream. Good luck report back.
Upload one or more videos to your post. Photo and video filesizes should be less than 5MB. Formats allowed are gif, jpg, png, ogg, mp4, mov, and avi. Be sure to use filenames without spaces or special characters, and filetypes of 3 digits lower case.
We sell tractor parts! We have the parts you need to repair your tractor - the right parts. Our low prices and years of research make us your best choice when you need parts. Shop Online Today. [ About Us ]
Today's Featured Article - Upgrading an Oliver Super 55 Electrical System - by Dennis Hawkins. My old Oliver Super 55 has been just sitting and rusting for several years now. I really hate to see a good tractor being treated that way, but not being able to start it without a 30 minute point filing ritual every time contributed to its demise. If it would just start when I turn the key, then I would use it more often. In addition to a bad case of old age, most of the tractor's original electrical system was simply too unreliable to keep. The main focus of this page is to show how I upgr
... [Read Article]
Latest Ad:
1964 I-H 140 tractor with cultivators and sidedresser. Starts and runs good. Asking 2650. CALL RON AT 502-319-1952
[More Ads]
All Rights Reserved. Reproduction of any part of this website, including design and content, without written permission is strictly prohibited. Trade Marks and Trade Names contained and used in this Website are those of others, and are used in this Website in a descriptive sense to refer to the products of others. Use of this Web site constitutes acceptance of our User Agreement and Privacy Policy
TRADEMARK DISCLAIMER: Tradenames and Trademarks referred to within Yesterday's Tractor Co. products and within the Yesterday's Tractor Co. websites are the property of their respective trademark holders. None of these trademark holders are affiliated with Yesterday's Tractor Co., our products, or our website nor are we sponsored by them. John Deere and its logos are the registered trademarks of the John Deere Corporation. Agco, Agco Allis, White, Massey Ferguson and their logos are the registered trademarks of AGCO Corporation. Case, Case-IH, Farmall, International Harvester, New Holland and their logos are registered trademarks of CNH Global N.V.